2008年7月28日 星期一

HALE 2008 - Brix-Catcher 升空就在今晚!

7/29美國內華達州時間5:57a.m.日出後(台北時間7/29 21:00),奇岩高空捕手(Brix-Catcher)即將隨著第一號氣球升空!

地點:N 40° 20’ W 119° 20.5' (直接將上述座標輸入Google Map即可看到升空區的地形)


這次升空任務,使用了兩個氣球:
第一號氣球(Balloon #1) 載運 :LUXPAK, Brix-Catcher(就是奇岩高空捕手), Peeps-in-Space, 學生籌載,通訊籌載(Energizer),攝錄影機籌載(NI),和 Reel-E.

第二號氣球(Balloon #2) 載運 :SLR 攝影機籌載,FLL Team 90,樂高Mindstorms團隊, Gypsy, 通訊籌載(NXT) ,和 Little Joe.

這次的任務,可以運用SPOT即時追蹤氣球的位置,請上SPOT即時追蹤網址,輸入Balloon #1", "Balloon #2" and "Little Joe"。SPOT只顯示氣球位置的資訊,沒有高度的資訊,而且當氣球高度超過4萬英呎即無法作用。SPOT主要是在回收氣球時,標示氣球墬落地點用的。

大家拭目以待!

2008年7月21日 星期一

HALE 2008 - 銘傳大學實驗組的照片

經過這幾個星期的實驗與討論
雖然最後我們的作品沒有被選上
我們作品的變數也還沒完全克服
所以最後選了周老師的作品
但是我們在這次的專題中
學到了很多的東西
非常的感謝黃柏俊老師以及蔡先生
謝謝他們給了我們這次的機會參與
我們才能從一開始走到現在

以下是我所補上的一些照片
是關於我們討論以及製作的過程


楊士賢正在檢查機器人

接著要做測試

要用機器人的手臂

去推下面那個裝著載玻片箱子

以達到收集微塵的效果


劉曜菖(右)正在編寫NXT的程式

機器人要能夠左右推動連接箱子的木棒

還要能夠利用輪軸上下的轉動

來上升或下降機器手臂

因為我們的作品高度有一點誤差

所以程式寫出來的高度必須要剛好到達位置


唐聖傑(左)正在測量位置

要利用那個軟墊

做出隔絕空氣的措施

經過測試機器人手臂的力道

可以推得動棒子


林聲在黏貼隔絕空氣的軟墊

經過了這道加工

軟墊可以幫助裝載玻片的箱子

不讓空氣進入箱子內部

以達到保持載玻片之乾淨


劉曜菖以及邱垂毅(我在桌子旁邊. . .)

正在連接程式測試機器人

測試機器人手臂提升的上下高度

以及手臂推動的力道

機器人擺放的角度等等


大家正在與蔡先生討論裝載玻片的箱子

要感謝蔡先生可以到銘傳大學來跟我們討論


大家正在與蔡先生討論機器人

蔡先生及黃柏俊老師給了我們很多的建議

像是機器人的轉軸就是老師建議我們的


這是最後成品的照片

內部是機器人以及裝載玻片的箱子

外面會再有一個外殼

外殼內有放照相機的空間

以及放NXT主機的空間

可以方便實驗人員拿起來裝電池


某次集合製作討論時的合照

地點是在銘傳大學


這張合照是在新莊的周老師家照的

當天就是要選出最好的作品

照片下方是我們的機器人以及外殼

最右邊的那個作品則是周老師的


雖然這次我們的作品沒有被選上
不過我們做到現在學到了很多東西
這次參與的機會可以說是非常的值得

在周老師那邊還看到了其他兩組
我也將他們的作品放上去

這是另外一組兩個高中生的作品

他們的構想是在蛋糕盒子的外邊挖一個洞

讓內部的樂高用NXT轉動

載玻片放在內部

當轉動到洞的時候就會收集空氣

載玻片之間有用軟墊隔間


這個便是周老師的作品

他是用磁力來推開上面那一片片的裝置

時間到的時候再用磁力吸回去

他也是用樂高在裡面轉動

只是他設計載玻片放置的位置是用磁力

最後投票大家都認為他的問題最少

所以推選他的作品寄去美國


這些是我們製作及討論這個專題時比較重要的照片
貼上來在這裡做一個紀錄
很高興有機會可以參與這次的專題
之後會再貼上分工及大家的心得

2008年7月20日 星期日

HALE 2008 - 慧友電子的數位錄影機

感謝慧友電子的廖矞如協理,黃裕峰以及趙志松先生的協助,提供一套卡片型(超輕)數位錄影機(DVR)及攝影機,讓Brix-Catcher HALE 2008的飛行任務,可以留下一 段影片回憶。

卡片型數位錄影機配上2GB記憶卡,初步測試可以錄8小時的影片。HALE的氣球飛行任務,預計上升過程是2小時、下墬45分鐘,記憶卡容量應開足夠。剩下的變數是電池在低溫下,能撐多久?

預計只要能拍到一些圓弧的地表、藍色的大氣、黑色的太空的影片,就算成功了!

HALE 2008 - Brix-Catcher 寄出去囉

我為酬載取了名字:"Brix-Catcher - H.A.L.E. 2008" 就翻譯作"奇岩高空捕手-哈雷2008"!
可是‧‧‧我寄出去前忘了最最重要的一件事,我忘了把Stick-To-It的膠帶保護膜拿掉!

只好請內華達大學那邊,幫忙囉!

2008年7月18日 星期五

HALE 2008 - justin組


大家好
我們是justin這一組
下面是我們的機器人圖片和介紹


這是矽膠板

原本我們是要用來隔絕空氣而裝在16片中空板上
不過矽膠這種東西摩擦力實在太大又難黏


只好換成透明片


這就是我們最初代的雙圓桶採樣機

大小不同的保麗龍蛋糕盒分隔成16間小空間

外圈開個洞

利用旋轉使不同高度的空氣進入並採樣

圓環

可使保利龍的摩擦力集中於內圈

進而達到減少的效果

新代的機器

改成透明玻璃紙後

摩擦力的問題跟著解決

重量也減輕許多

HALE 2008 - Justin Team - learn and lessons

in this project, we faced multiple challenges

first of all, the supply. Our team doesn't have the proper supplies. the only things we will be using are ones that can be found commonly.
that limits are techniques of building up the payload.

since we are limited, the technique we use will cause lots of friction, which the NXT motor can barely spin it.

those were the two major problems we faced.

for the first problem, we just had to try our best. we had to keep trying different materials until we get into the best shape. however, time is also a problem. we only had 3 weeks to build up the payload. the efficiency of our work was important too.

for the second problem, we increase the motor power by using more gearwheel transferring more energy on it. yet, the problem still goes back to the supply. since the motor needs to generate enormous power, the materials also need to be able to resist that power. we broke lots of materials because of that

i have learned a lot of different techniques of building stuff. we had to use materials that can be bought commonly.

also, i have learned how to bear the hardship of failure. there is no way to success in one try. i had to rebuild the robots many times. it is annoying but it's the only way to succeed.

this project was new to me and new to the whole team. i used to only use lego pieces to build robots. now, i went to the next level. i am not only using lego any more. i am playing with a more advanced type of robots.

HALE 2008 - Justin Team - building up

1. Prepare a size of 11 and 13 inch Styrofoam cake box

2. cut wholes in the middle of the two boxes with diameter 4 cm


3. make a gear that has the power of *24x36 (shown as the picture)

4. put the gear in the center of the 11” box and tape it(or and other method to connect it) with the 11” box.


5. around the 11” box, mark the circumference to 16 same sized parts

6. find a plastic folder and cut 16 pieces of the size of 14.5 cm to 2 cm


7. draw the line down the box and make a light cut threw the mark so the strips can barely fit in

8. glue or stick the strips into the indentation


9. now, fit in the smaller box into the bigger box


10. middle gearwheel will be connected to the bigger box

11. make a cape that could perfectly fit the two boxes with sealing the spaces between the two boxes


12. cut a 3.5 cm to 5 cm whole on the bigger box

13. the final processes, including connecting the NXT, putting strings on... etc.

HALE 2008 - H.A.L.E

話說接到H.A.L.E( http://www.unr.edu/nevadasat/HALE/ )任務後,便開始討論任務目的,還有酬載的運作形式
先說說任務目的吧~~經由蔡老師的努力奔走之下,終於有國內某家廠商大力贊助 SKC岀品的Stick-to-it( http://www.skcinc.com/prod/225-9808.asp ) 提供我們做為大氣垂直分段品質偵測的物件東西的樣子如下:
DSCN7308
這東西只要撕開中間咖啡色的部分就能黏著空氣中的細小微粒

有了偵測物便要開始構築機體形狀由最初的雙層夾艙式(就是林國印及黃彥閎製作的形式)
盒

再討論出盤狀式
盤
由於計算後發現體積過於龐大而作罷

所以又延伸為柱狀式的結構
柱
此結構形式也成為本次最後的形式

動作模式為中心有一旋轉的轉子由NXT控制旋轉角度,並黏上一銣硼強力磁鐵,外層則為測試玻片所在處密封方式利用軟鐵及軟性磁鐵運用磁力吸附密封,開闔由外加銣硼磁鐵與內圈轉子呈現斥性作為開啟的方式.
外
此為Space Colony No.1外層

轉子
此為Space Colony No.1內層轉子

PS:為何要叫Space Colony? 因為它就長的有點像GANDAM裡的開放型宇宙殖民地 借用一下網路上的圖大家會更明白

在做完Space Colony No.1 測試之後發現許多問題,例如:轉動摩擦力過大,施工方式不易,外部機體預留太短等等..
所以在時間允許之下就有了Space Colony No.2 的誕生

因為時間所剩不多,沒有時間再做實物錯誤嘗試,所以利用多媒體軟體LightWave來做一下輔助設計的工作,
No2內
轉子部分修改的有上下加入滾珠導軌及滾珠,縮小轉子尺寸減少摩擦力,並且將磁鐵放於轉子外部以利於施工

No2外
外部隨著轉子縮小也可縮小其尺寸,並加長外部尺寸以便以後增加任務設備之需求.

有人會說為何不用工業界使用的軟體來做,因為我不會,嘿嘿~~這答案夠清楚了吧~而且多媒體有個好處做完之後可以來做個動畫無須再做轉檔的工作,輕鬆方便~~

既然模擬操作都已經完成接下還就是實做部分了~

製作型式由內而外,先做轉子部分.
轉子圓周
先利用中空板裁剪出轉子的圓周長度,並且將中空板預計在外部的那面將其中空連接的表面一一劃開但不切斷以利彎曲(這步驟相當費時費工)

轉子圓周圍上
接下來將轉子的圓面(上下各一)和剛剛的圓周長黏合

轉子上方
在上一步驟做好的轉子上下兩面上貼上滾珠導軌,各位眼尖的看官也許會發現導軌跟設計的不同,因為計劃永遠趕不上變化嘛~之前設計是分四區,但是發現如果將其貫通運作會更順暢.

轉子上方加轉軸層
接下來在導軌上貼上轉軸層,轉子旋轉就靠這層和外部圓洞作旋轉的基礎,順便也將負責開闔的磁鐵黏於圓周上.

轉子底部
將預計朝下的一面規劃出16等分,將其貼上黑與白膠帶以便區分角度,並將負責動力的齒輪固定上去.

外層合體
將16邊形桶狀外部做出,並且將轉子放入,放入時要記得將兩面的滾珠導軌中放入滾珠.

07
將轉子底部滾珠層覆蓋後並在此層加入動力設備

動力近拍
動力設備近攝~~

08
與外層結合狀況

09
放正時之模樣

10
外部開闔磁鐵黏貼方式

掀板
掀板以及密合區

2008年7月16日 星期三

H.A.L.E. Payload Preparation Istructions (Draft)

1. Let the bottom of the payload face up
2. Tear off the black tape
3. Open the petals
4. Remove the “Bottom” board
5. Pull out the foam from the place where it says “PULL me
6. Remove the NXT from its compartment
7. Place in batteries in the NXT
8. Now, connect the wire A to NXT output A (wires are labeled)
9. Connect Wire “2” to NXT input 2
10. Turn on the NXT
>Go into “My Files”
>Go into “Software Files”
>Go into the file “HALE-TW”
>Run the file
11. Connect Wire “1” to NXT input 1
12. Place the NXT back into it’s compartment
13. Place eight AA batteries into the battery pack
14. Connect the battery pack with the black box (camera)
15. Place the bottom foam back into the payload (match the marking)
16. Place the bottom board back into the payload
17. Close the bottom with black tapes as shown as the pictures
18. Make the payload’s top facing up
19. Connect the green strings to the main balloon strings
20. Press the button twice right before the payload is up in the air

2008年7月11日 星期五

HALE 2008 - 銘傳大學實驗組

各位大家好!
我們是銘傳大學的學生
以下是我們做的機器人以及一些圖片
就由我來先做一些簡介


這個是我們的機器人模型

我們的構想是用機器人的手臂去推動盒子(或木頭)

讓裝了載玻片的盒子可以出去採集

它的手臂可以轉動

也可以藉由上面吊的線來上下移動

設計放載玻片的盒子式直立式的

所以會需要上下移動


這個是設計放載玻片的盒子

中間那可以轉動的地方會放入載玻片

經由機器人的手臂去推動它之後會跑出去收集

等到設定的時間到了之後會經由手臂再推回來


以上是我目前所做的簡介
之後的會陸續放上

2008年7月10日 星期四

HALE 2008 - **IMPORTANT** from Justin

our group, the high school group, has decided to use the new technique. the one that is recently updated is the one we are working on. The other machine that was post ago isn't as good as the new one, so we decided to replace the old one. Don't get confused


-Justin Lin reminds you

HALE 2008 - feelings and difficulties

hey guys, bad news, we got only a week to put our robots up in the air

in our Taiwan team, we split to 3 groups, temporarily.

-six college students (MingChuan University)
-two high school students (Justin Kou Ing Lin, Taipei American School / David Huang, Taipei Municipal Jianguo High School)
-Professional Engineer/teacher(Mr. Chou)

as the whole team, our goal is to send a auto machine to take samples up in the air.
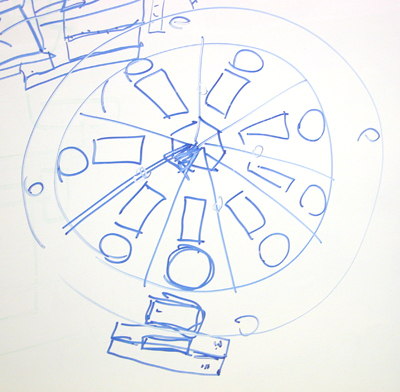
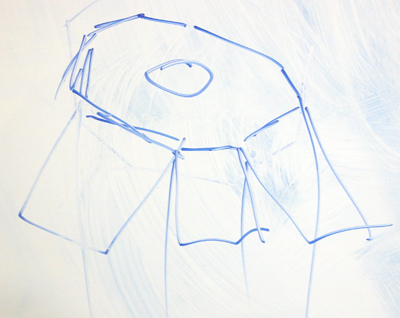
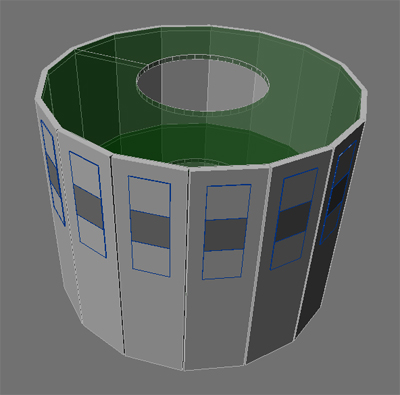
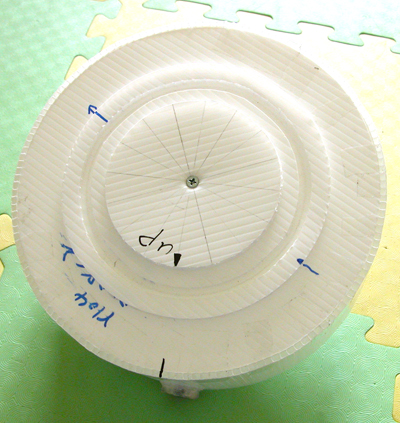
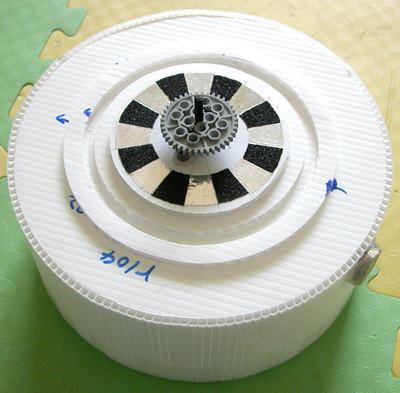
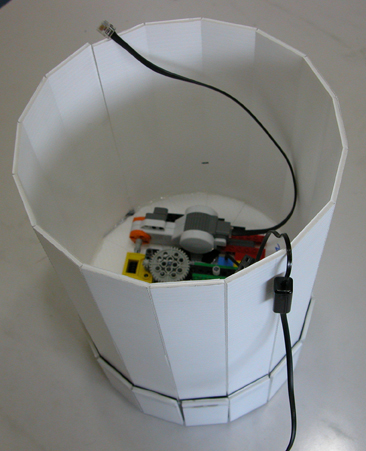
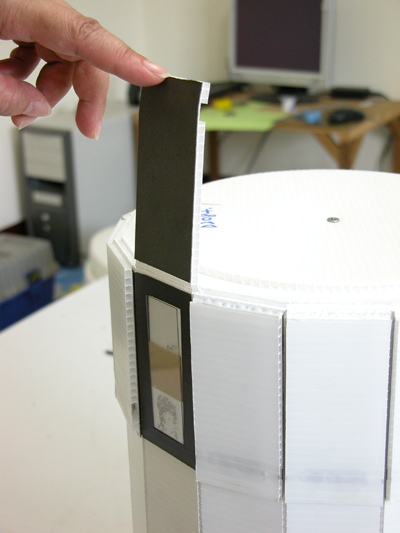
our high school group designed is shown as the picture below


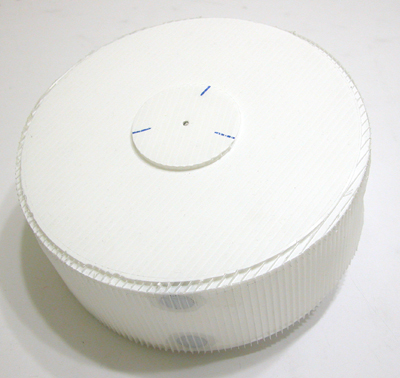
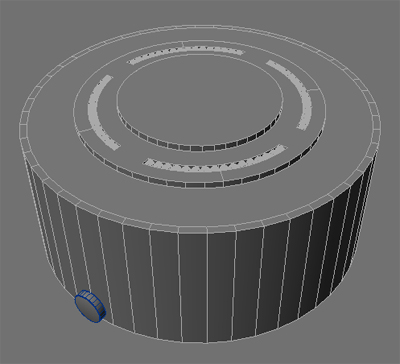
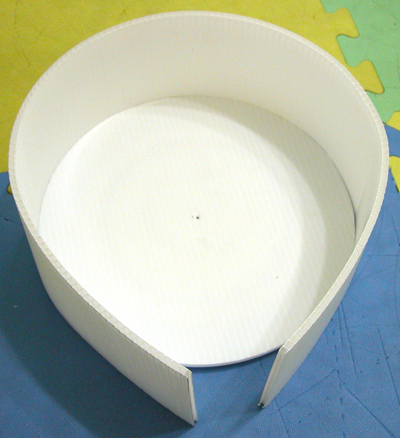
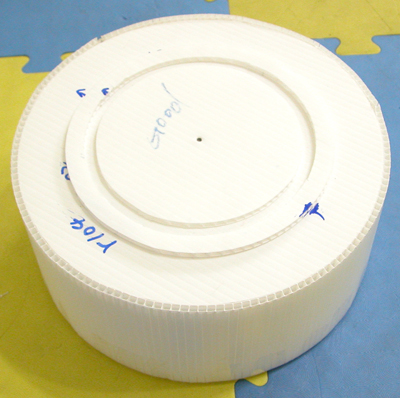
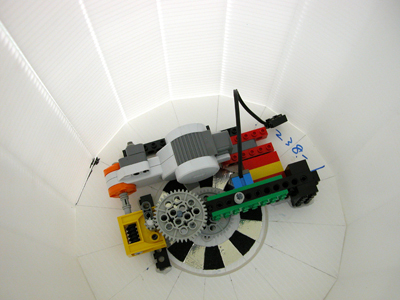
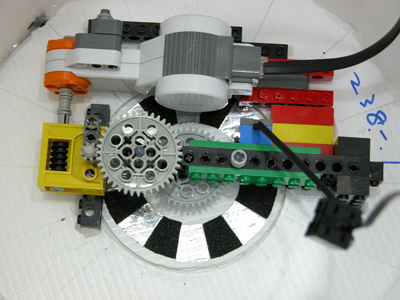
we have two layers of cake styrofoam that is connected by a turning point. the motor in the middle is connected to the top layer, which will be turning the lower layer. We have sixteen individual sealed rooms which each will hold a sample taking tape. There will be a small whole on the outer layer of the cake box so whenever the outer layer is turned to, one out of the sixteen rooms will be exposed to outer air to take sample.


each group from our team has distinctive designs, which we, as a team, will choose the best one to send up in the air.
for our group, the high school team, we faced many challenges. The most obvious challenge for us is the resources and technology we have. Don't even talk about a professional engineer, even college students have their own labs and advance equipments. We only have common tools and our hands. Consequently, we faced inaccurate measurements and incisions.
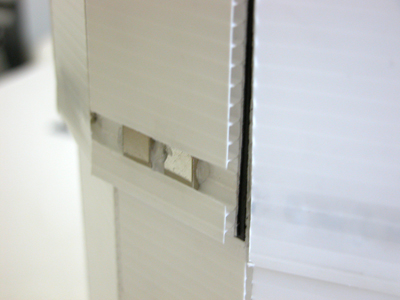
Secondarily, we need to make sure each individual room is absolutely isolated because we don't want the elements that was taken on each sample to spread throughout the sixteen rooms. there will be no point of making sixteen rooms if that happens. Since the outer layer is turning around the the inner layer of the cake box, there must be some tiny crack at the common boundary connecting the inner layer and outer layer. that tiny crack is enough to let elements from each room to spread around. One of our solution is to use a special material, silica gel. Since the material is flexible, we will use that to be the doors that isolate each room. The silica gel will scrape on the outer layer to make sure each room's dust is kept within it's own space.(the silica gel will be attached on the inner layer.) however, the silica gel will increase the resistance that the motor will have to overwhelm it. we still have to test the motor's strength and find a way to decrease that resistance as much as possible.
Our final task, if every problem above is solved, will be how flinty our compartment should be when it plonks(fails) from 33,000 meters above the ground and all are rooms are still contaminated.

This is a rare and interesting project for us. WISH EVERYONE IN THE TEAM "GOOD LUCK!!"


-Justin Lin